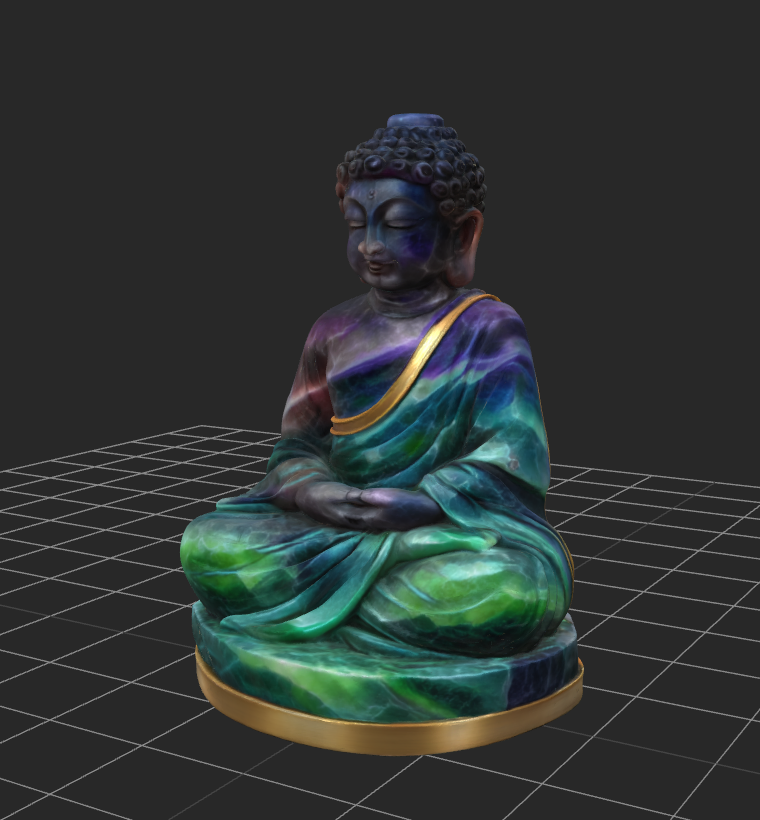
The exported 3D mesh in Foundry. You can watch the camera orbit that helped build it in step 2.
One picture of a fluorite Buddha became a turnaround sheet, a moving camera orbit, and then a textured 3D model. Here's the whole trip through Mumblebox 3D Asset Foundry, including what I checked along the way and how you can work with your agent from your phone.
This walkthrough uses Preview 28 and the Orbit to Mesh wizard. The result has 4096 × 4096 textures, a detailed GLB, and a reduced GLB for further game development. The seated silhouette, face, robe folds, and gold trim all came through. I included a side view so you can see how much depth the mesh kept.
Start here
Install and start Mumblebox 3D Asset Foundry through Pinokio. Open Choose a Workflow → Create a Mesh from an Image → Orbit to Mesh. Let any required model preparation finish before starting a generation.
The route is reference → turnaround and orbit → selected views → mesh → finish and export. You can follow the wizard yourself or work alongside an agent connected through MCP. For a first run, I like going stage by stage so I can inspect the result before moving on.
1. Give it a clear reference
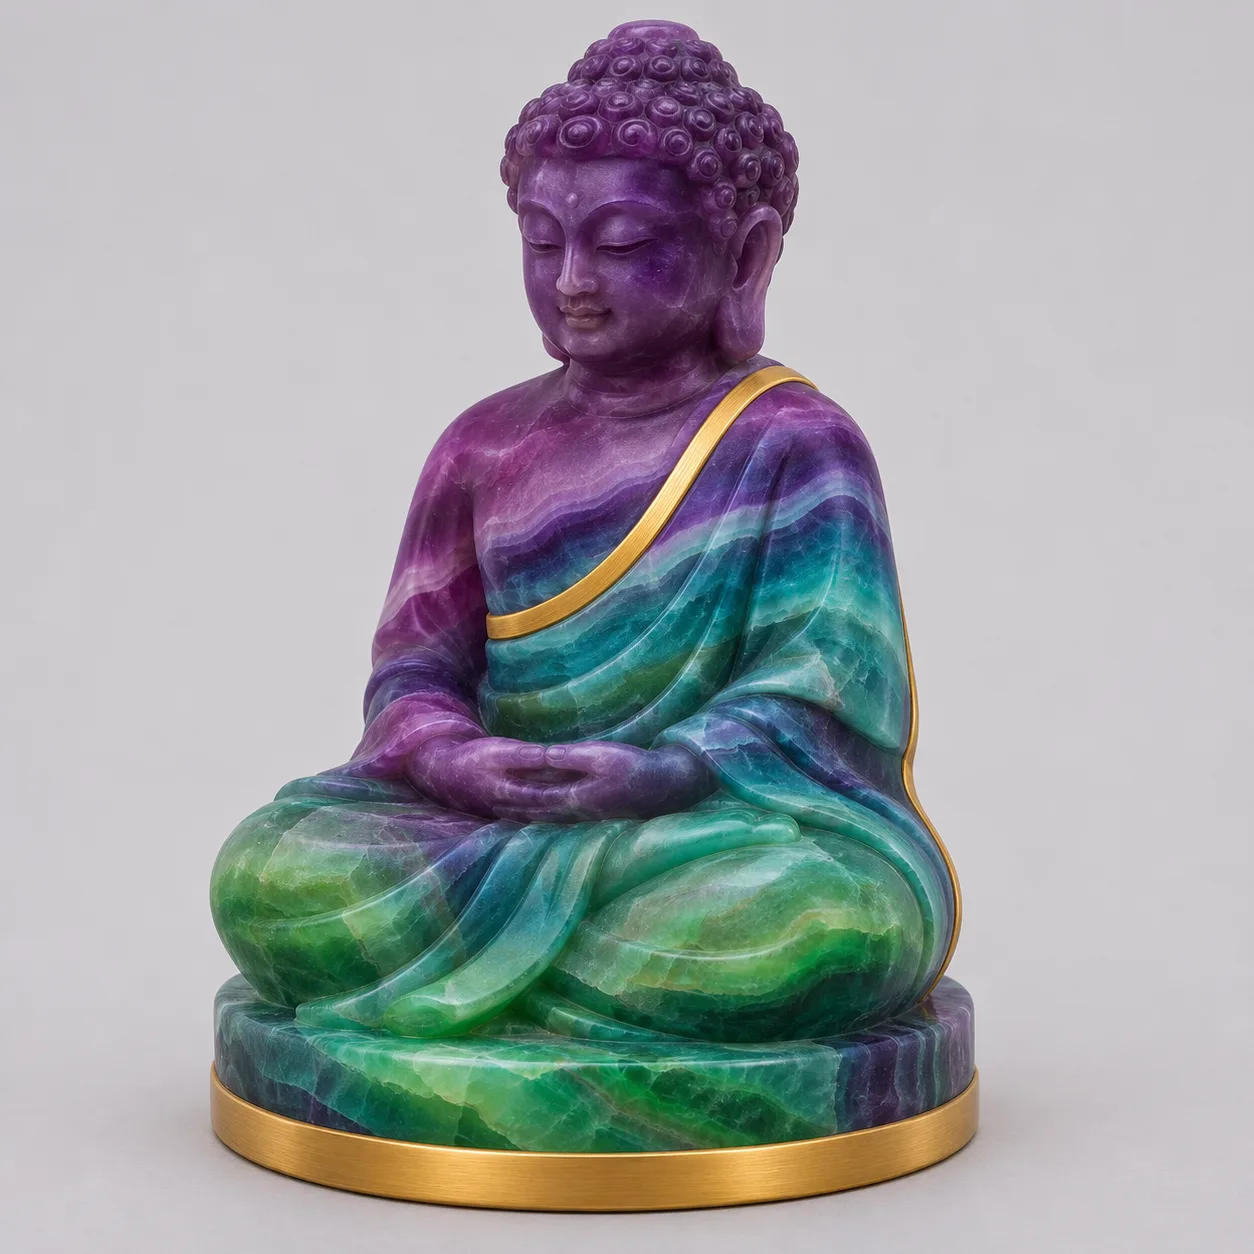
Name the asset and choose Upload an image. You can also create an image in Foundry or choose one from Gallery. Keep the whole subject in frame, including thin parts such as handles, trim, and accessories.
I named it Fluorite Buddha and used the Full steps · 3 seconds preset (768 × 768, 28 steps, Turbo off, and 73 frames at 24 fps).
The Subject direction field is where you can tell Foundry what to preserve. I kept the built-in direction for this run. For a carving like this, you might call out the seated pose, gold trim, or the shape of the base.
2. Review the turnaround and the orbit
Generate the turnaround first. This gives H3 four views to work from. Check that the shape, pose, colors, and small details stay consistent across the front, side, three-quarter, and back views.
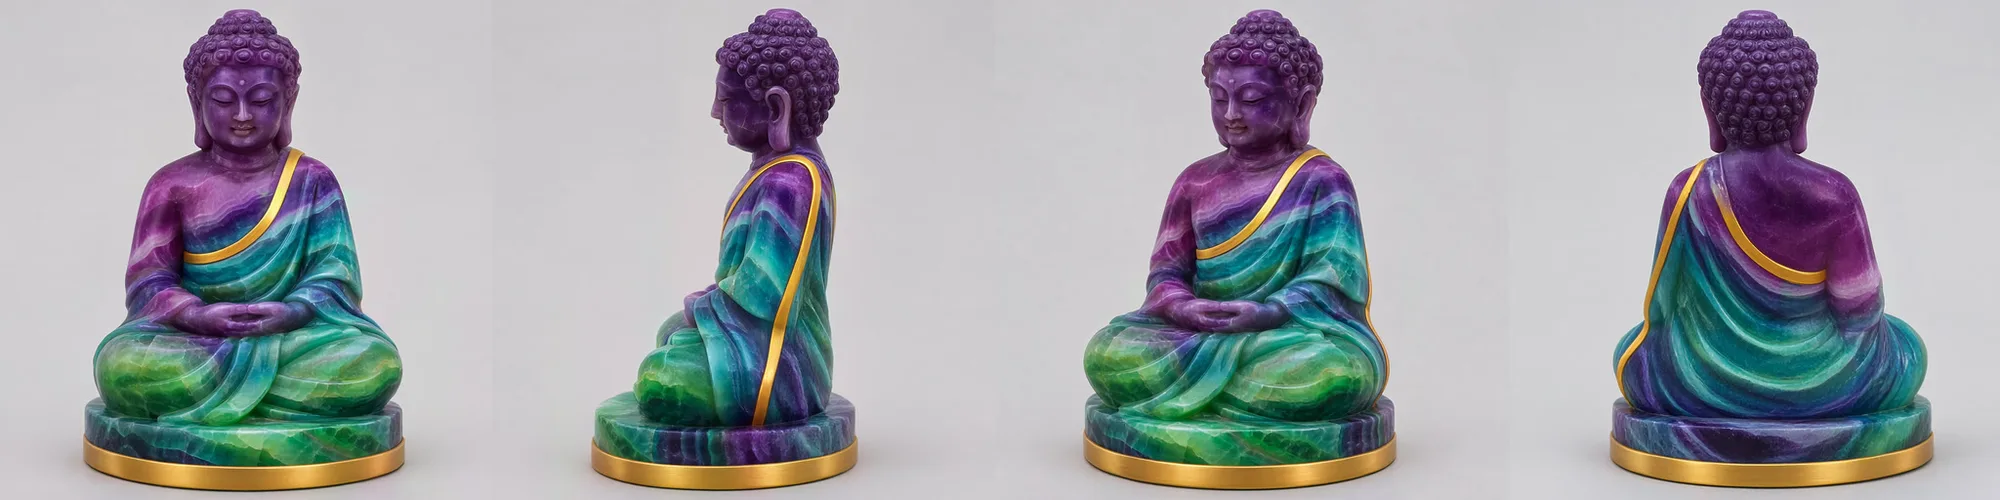
Then generate the orbit. The camera should travel around the stationary subject at a steady height and distance. Watch the complete turn before moving on.
This is the finished camera-orbit video used as reconstruction input.
Look for parts that bend, disappear, change sides, or drift as the camera moves. Also check the framing and the return to the opening view. A smooth video can still contain inconsistent geometry, so pause on the awkward angles. If something important changes, revise the direction or regenerate before spending time on reconstruction.
3. Choose the views that will build the mesh
Continue to Choose mesh views. Foundry aligns the cameras and presents views from around the subject for Pixal3D.
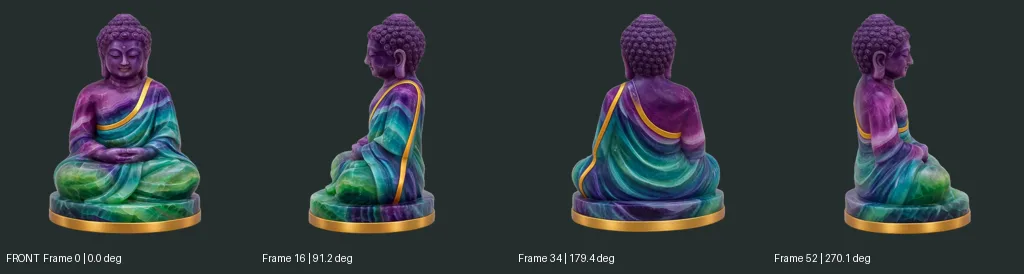
I used 4 views · Recommended default and a shape resolution of 1024. Inspect each selected frame. Uncheck a view if it is blurred, warped, or missing an important part. Keep the front and at least one other view. More views are an option, but consistency matters more than simply increasing the count.
4. Inspect the rough shape
Build the mesh, then rotate it in Review the mesh. Check the silhouette, face, underside, and the contact with the base. A side view makes it easier to see whether the face and body have kept their depth.
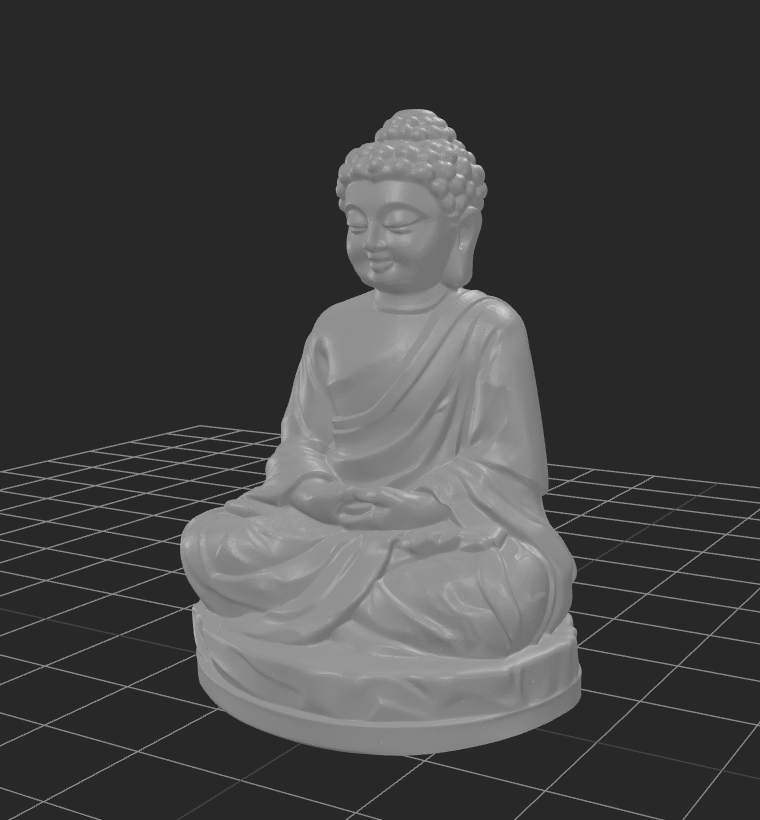
This is the place to decide whether the starting shape is good enough to finish. Hi3D uses the original reference for refinement. Foundry then cleans the geometry and applies TRELLIS.2 texturing. Later processing can improve the result, but it does not guarantee that every missing detail will return.
5. Finish with 4K textures and export
In Finish and export, I chose 4096 for texture size and kept the 500,000 triangle limit for texturing. That limit controls the mesh sent to texturing and UV unwrapping. Foundry retains the clean master separately.
Choose only the output versions and formats you need, then use Prepare asset package. Here's what I exported.
- Detailed GLB with 499,650 triangles and 4K material maps.
- Balanced GLB with 250,000 triangles, 4K material maps, and baked normal maps in the package.
- An asset ZIP with the models, textures, README, and model licenses.
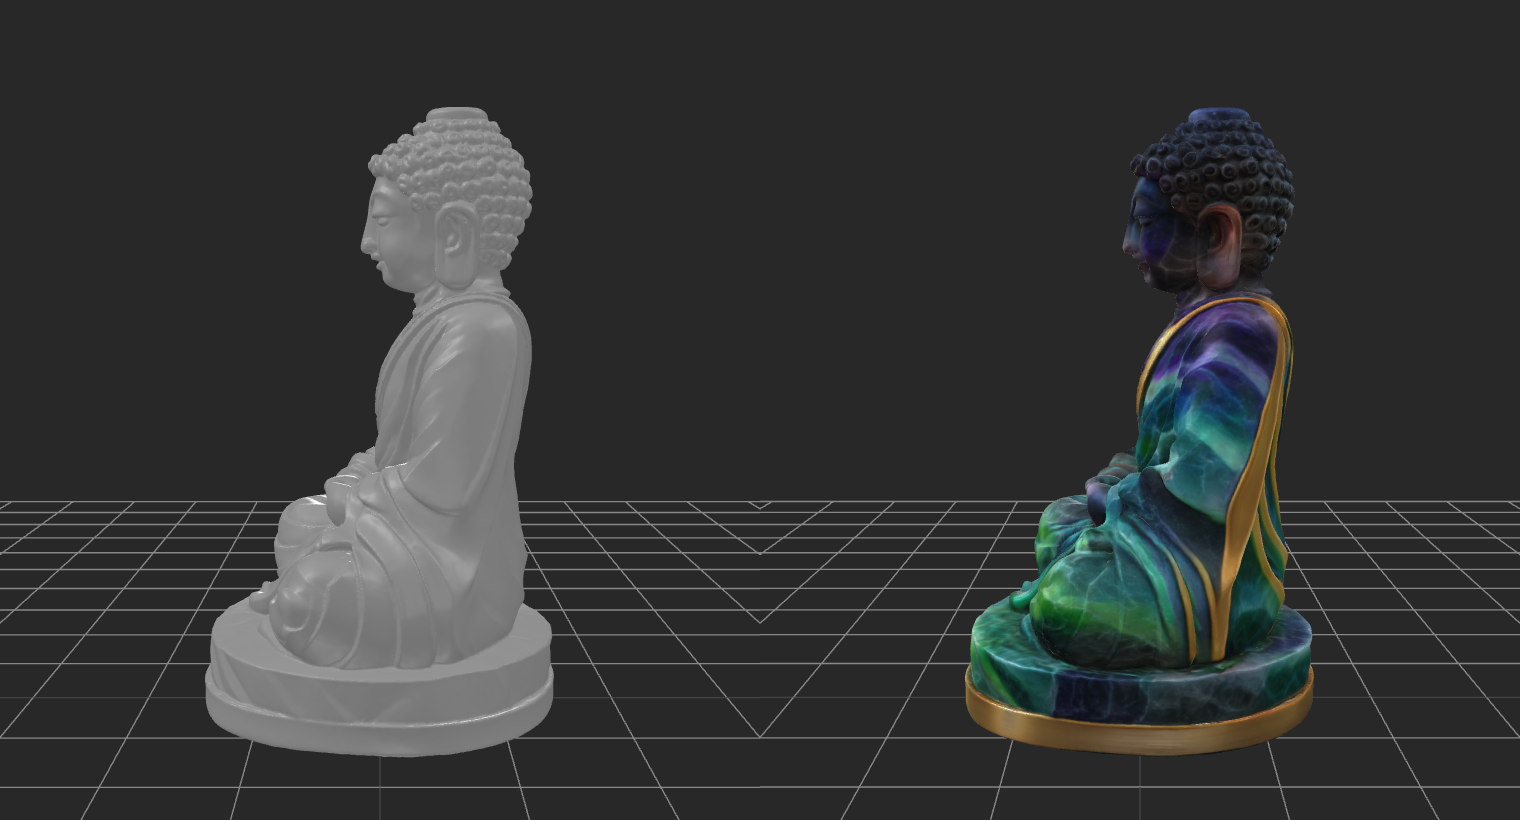
The cleaned mesh is on the left. The finished textured mesh is on the right.
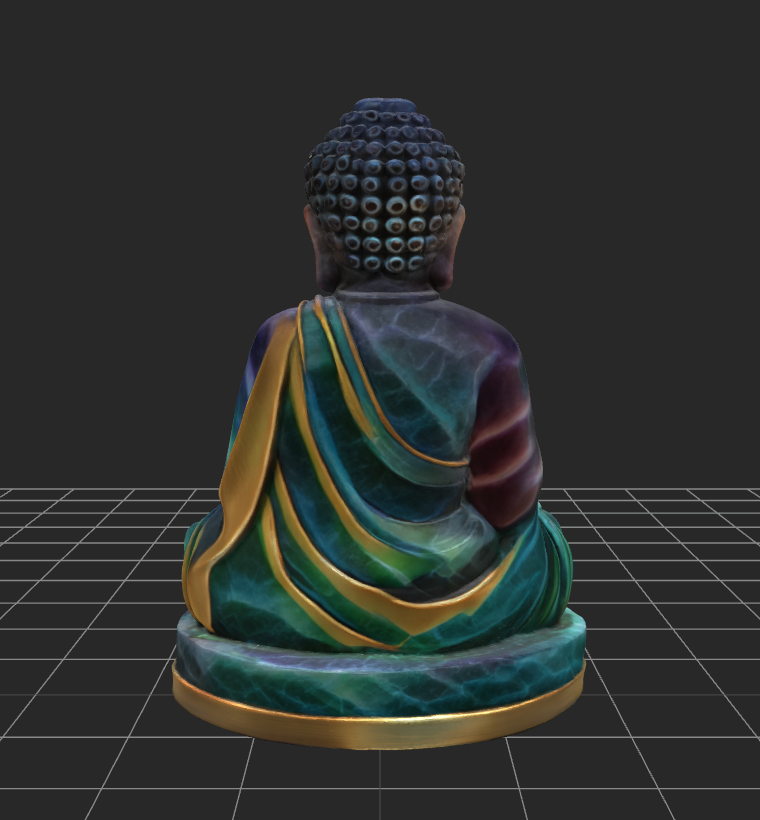
Download the ZIP and review the model from all sides. The face came out a little darker than the reference, and some folds picked up extra gold on the back. Those are the details I’d check before deciding whether to do more material work in Blender.
Work with Foundry from your phone 📱
With MCP, you can work with Foundry from your phone through your agent's connected app—giving instructions in plain language, checking progress, and viewing results wherever you are.
This is one of the parts I'm most excited about. You can discuss the result, ask for another view, or decide what to do next while you're away from the PC. Your PC runs Foundry and the models; your compatible agent app carries the conversation and connects to that work.
To get started, open Connect your agent in Foundry. Choose any optional Blender skill repositories you want, copy the setup prompt, and paste it into your coding agent. The setup connects the MCP and Foundry's companion skill, which helps the agent understand the workflows. Keep the app, MCP, and companion skill current so the agent sees the available controls.
Once connected, an instruction can be as simple as:
Use Foundry's Orbit to Mesh workflow with this image. Name it Fluorite Buddha. Start with the full-steps, three-second preset. Show me the turnaround and orbit before building the mesh, then help me review the result and export a detailed GLB with 4K textures.
The agent should check Foundry's available capabilities and use your existing workflow. Phone access depends on your agent app's connection to the PC; keep Foundry's local service private. Agent setup details are available if you want the configuration steps.
You still decide what looks right. MCP makes it easier to keep that conversation going while the tools do the work.
A quick hello in every supported language
Foundry now supports English, Simplified Chinese, Latin American Spanish, French, and Brazilian Portuguese. If I've got anything wrong—in the tutorial, the translations, or the app—I'm open to corrections and any help you'd like to offer.
- English: Thanks for trying Foundry—your ideas and help are always welcome!
- 简体中文: 谢谢你试用 Foundry!欢迎提出建议,也欢迎帮忙改进。
- Español (Latinoamérica): ¡Gracias por probar Foundry! Sus ideas y su ayuda son siempre bienvenidas.
- Français : Merci d'essayer Foundry ! Vos idées et votre aide sont toujours les bienvenues.
- Português (Brasil): Obrigado por experimentar o Foundry! Suas ideias e sua ajuda são sempre bem-vindas.
If you make something with it, I'd love to see it. 🙂

The exported 3D mesh in Foundry. You can watch the camera orbit that helped build it in step 2.
One picture of a fluorite Buddha became a turnaround sheet, a moving camera orbit, and then a textured 3D model. Here's the whole trip through Mumblebox 3D Asset Foundry, including what I checked along the way and how you can work with your agent from your phone.
This walkthrough uses Preview 28 and the Orbit to Mesh wizard. The result has 4096 × 4096 textures, a detailed GLB, and a reduced GLB for further game development. The seated silhouette, face, robe folds, and gold trim all came through. I included a side view so you can see how much depth the mesh kept.
Start here
Install and start Mumblebox 3D Asset Foundry through Pinokio. Open Choose a Workflow → Create a Mesh from an Image → Orbit to Mesh. Let any required model preparation finish before starting a generation.
The route is reference → turnaround and orbit → selected views → mesh → finish and export. You can follow the wizard yourself or work alongside an agent connected through MCP. For a first run, I like going stage by stage so I can inspect the result before moving on.
1. Give it a clear reference
Name the asset and choose Upload an image. You can also create an image in Foundry or choose one from Gallery. Keep the whole subject in frame, including thin parts such as handles, trim, and accessories.
I named it Fluorite Buddha and used the Full steps · 3 seconds preset (768 × 768, 28 steps, Turbo off, and 73 frames at 24 fps).
The Subject direction field is where you can tell Foundry what to preserve. I kept the built-in direction for this run. For a carving like this, you might call out the seated pose, gold trim, or the shape of the base.
2. Review the turnaround and the orbit
Generate the turnaround first. This gives H3 four views to work from. Check that the shape, pose, colors, and small details stay consistent across the front, side, three-quarter, and back views.
Then generate the orbit. The camera should travel around the stationary subject at a steady height and distance. Watch the complete turn before moving on.
This is the finished camera-orbit video used as reconstruction input.
Look for parts that bend, disappear, change sides, or drift as the camera moves. Also check the framing and the return to the opening view. A smooth video can still contain inconsistent geometry, so pause on the awkward angles. If something important changes, revise the direction or regenerate before spending time on reconstruction.
3. Choose the views that will build the mesh
Continue to Choose mesh views. Foundry aligns the cameras and presents views from around the subject for Pixal3D.
I used 4 views · Recommended default and a shape resolution of 1024. Inspect each selected frame. Uncheck a view if it is blurred, warped, or missing an important part. Keep the front and at least one other view. More views are an option, but consistency matters more than simply increasing the count.
4. Inspect the rough shape
Build the mesh, then rotate it in Review the mesh. Check the silhouette, face, underside, and the contact with the base. A side view makes it easier to see whether the face and body have kept their depth.
This is the place to decide whether the starting shape is good enough to finish. Hi3D uses the original reference for refinement. Foundry then cleans the geometry and applies TRELLIS.2 texturing. Later processing can improve the result, but it does not guarantee that every missing detail will return.
5. Finish with 4K textures and export
In Finish and export, I chose 4096 for texture size and kept the 500,000 triangle limit for texturing. That limit controls the mesh sent to texturing and UV unwrapping. Foundry retains the clean master separately.
Choose only the output versions and formats you need, then use Prepare asset package. Here's what I exported.
The cleaned mesh is on the left. The finished textured mesh is on the right.
Download the ZIP and review the model from all sides. The face came out a little darker than the reference, and some folds picked up extra gold on the back. Those are the details I’d check before deciding whether to do more material work in Blender.
Work with Foundry from your phone 📱
With MCP, you can work with Foundry from your phone through your agent's connected app—giving instructions in plain language, checking progress, and viewing results wherever you are.
This is one of the parts I'm most excited about. You can discuss the result, ask for another view, or decide what to do next while you're away from the PC. Your PC runs Foundry and the models; your compatible agent app carries the conversation and connects to that work.
To get started, open Connect your agent in Foundry. Choose any optional Blender skill repositories you want, copy the setup prompt, and paste it into your coding agent. The setup connects the MCP and Foundry's companion skill, which helps the agent understand the workflows. Keep the app, MCP, and companion skill current so the agent sees the available controls.
Once connected, an instruction can be as simple as:
The agent should check Foundry's available capabilities and use your existing workflow. Phone access depends on your agent app's connection to the PC; keep Foundry's local service private. Agent setup details are available if you want the configuration steps.
You still decide what looks right. MCP makes it easier to keep that conversation going while the tools do the work.
A quick hello in every supported language
Foundry now supports English, Simplified Chinese, Latin American Spanish, French, and Brazilian Portuguese. If I've got anything wrong—in the tutorial, the translations, or the app—I'm open to corrections and any help you'd like to offer.
If you make something with it, I'd love to see it. 🙂